When it comes to car maintenance, knowing how to install a replacement radiator hose safely is crucial. A damaged hose can lead to severe engine issues. Understanding the installation process can help you avoid costly repairs and ensure your vehicle runs smoothly.
This guide offers ten essential tips for safe radiator hose installation. Each tip draws from experience, ensuring reliability and authority in the information provided. You will find practical advice and methods that can be applied regardless of your skill level. This way, even if you are not a professional mechanic, you can complete the task effectively.
Radiator hoses are vital for maintaining engine temperature. A secure, leak-free installation keeps your cooling system functional. Mistakes can happen, and it’s important to recognize them. Learning what not to do can be just as valuable as knowing the right steps. With this guide, you can approach the task with confidence and care.
A properly installed radiator hose is critical for your vehicle’s performance. A significant number of cooling system failures can be traced back to improper installation. In fact, industry studies show that nearly 25% of vehicles face overheating issues due to a faulty radiator hose connection. This emphasizes the need for attention to detail during installation.
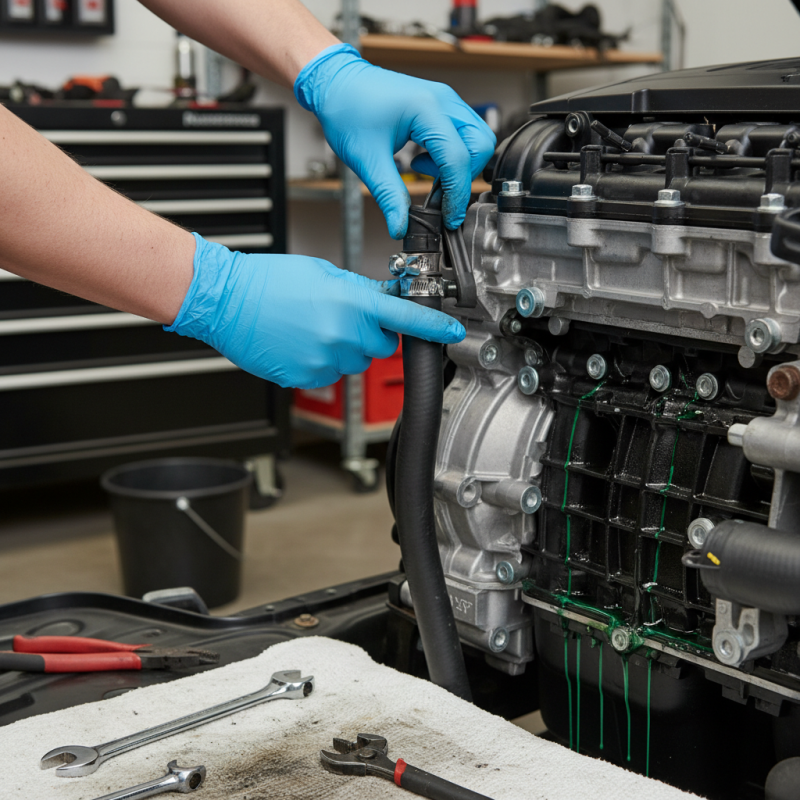
When replacing a radiator hose, ensure that the hose fits snugly onto the fittings. A loose connection can lead to leaks, impacting coolant flow. It's essential to check the hose clamps and tighten them adequately. Insufficient clamping may result in coolant loss, which can damage the engine over time. Moreover, inspect the entire cooling system. Overlooked wear and tear in adjoining parts could undermine the effectiveness of the new hose.
Temperature variations can also affect hose integrity. Research indicates that hoses can degrade faster under extreme temperature fluctuations. Ensure you choose high-quality materials that withstand these conditions. Failing to do so might lead to a shorter lifespan for the new hose. Regular inspections of your installation can help address these challenges before they escalate.
| Tip No. | Tip Description | Importance | Recommended Tools |
|---|---|---|---|
| 1 | Always let the engine cool down before starting the installation. | Prevents burns and injuries. | None |
| 2 | Use protective gloves to avoid skin contact with coolant. | Safety from toxic coolant exposure. | Gloves |
| 3 | Gather all necessary tools before starting the job. | Ensures efficiency and prevents interruptions. | Wrenches, clamps, replacement hose |
| 4 | Inspect the old radiator hose for signs of wear or damage. | Identifies potential issues before installation. | None |
| 5 | Ensure that the replacement hose matches the specified length and diameter. | Prevents leaks and ensures proper flow. | Measuring tape |
| 6 | Use new clamps instead of reusing old ones. | Ensures a secure fit and prevents leaks. | New clamps |
| 7 | Follow the manufacturer's instructions for installation. | Ensures compatibility and safety. | Installation manual |
| 8 | Tighten clamps securely, but avoid overtightening. | Prevents hose damage while ensuring a proper seal. | Screwdriver or wrench |
| 9 | Refill coolant after installation and bleed the system. | Ensures proper coolant flow and prevents overheating. | Coolant, funnel |
| 10 | Test drive the vehicle and check for leaks. | Verifies successful installation and safety. | None |
: A proper installation prevents overheating issues. Nearly 25% of vehicle cooling failures are due to faulty hose connections.
The hose should fit snugly on the fittings. Loose connections can lead to leaks and impact coolant flow.
Inspect hose clamps and tighten them. Look for wear on adjoining parts; neglecting this could undermine the new hose.
Extreme temperatures can degrade hoses quickly. Choosing high-quality materials may extend the hose's lifespan.
Always allow the engine to cool. Wear gloves and goggles to prevent burns or injuries during removal.
Loosen the hose clamps with a screwdriver. Twist the hose gently to break the seal without damaging surrounding components.
Inspect connection points for rust or cracks. Addressing these issues can help ensure a good seal for the new hose.
Common tools include pliers, a screwdriver, and hose clamps. Having the right tools ready minimizes installation errors.
Position the hose correctly during installation. Misalignment can cause friction, ultimately damaging the hose.
Regular checks help prevent failures. Over 40% of radiator issues are linked to hose problems; vigilance is essential.
When it comes to understanding "how to install a replacement radiator hose safely," recognizing the importance of a properly installed hose is crucial. A well-functioning radiator hose ensures your vehicle’s cooling system operates effectively, preventing engine overheating. Before starting, it's essential to gather the necessary tools and materials to facilitate a smooth replacement process.
The installation process involves several key steps: first, carefully removing the old radiator hose while taking precautions to avoid spills. Next, the new hose must be installed using effective techniques to ensure a secure fit, preventing leaks or disconnections. Finally, once installation is complete, testing the system and maintaining the new hose are vital for long-term performance. Following these guidelines will help ensure that your radiator hose replacement is done safely and efficiently.